We use Fujicolor Crystal Archive Paper and then the Digital Professional version, in which the highest concentration of silver is used to attain the deepest density and flawless sharpness. OK, but how is this paper made? We took a peek behind the scenes in the photo factory.
The huge one
Tilburg houses an enormous photo factory that produces photo paper for all of Europe. What goes on there is truly impressive, especially the amount of photo paper produced in a single day: a whopping 400km! And, all in the dark. If you’ve been involved in photography for a while, you would have developed your photos yourself in a Dark Room. That was where the magic happened, only nowadays it’s all done by machines. In our Noritsu machine (for small prints up to 30×45 cm wide and the photo books) and the Durst Theta machine (everything bigger than 30×45 cm), we still use the same photo paper; paper that cannot see any light at all and where no single droplet of ink comes into play. These work with LEDs that expose the paper using the three RGB colours; red, green and blue. The chemistry develops this latent image into a visible photo.
From paper to photographic paper
It all starts with run-of-the-mill paper. Firstly, this is laminated with a polyethylene layer (a type of plastic coating) at the top and bottom. At the top the structure is simultaneously applied (for a glossy or matte surface). Then, the process really takes off, to turn it into silver halide photo paper. This is rather a technical process.
Silver crystal has to be made in order to create clear whites, and especially deep blacks too. Silver crystal is made by blending sodium chloride (salt) and silver nitrate, which turns itself into sodium nitrate and silver chloride (crystals). The next step is preventing the colours of the paper fading or being rubbed off. For this a solution was devised to mix oil with water, to create an oil & water elmulsion layer that prevents the colours of the paper being rubbed off.
Then, the coating process starts. The emulsion pot such as described above and the previously laminated roll are then brought together. The emulsions are melted and the 7 stations automatically filled. The silver halide and oil & water emulsion are mixed in the emulsion tanks with gelatine bonding agent and other chemicals, to create the photographic layer. This creates a whopping 7 different layers. These layers are stacked on top of one another by a coating machine, and applied in equal measure to the paper. And, all in the dark.
The silver halide crystals only to be found in the colour layers are sensitive to the laser light emitted by our Noritsu and Durst printers. This light activates the silver halide crystals so that the pre-pigments can make colour during the developing process.
- Red light (makes cyan)
- Green light (makes magenta)
- Blue light (makes yellow)
- Separating layers and top shield layers
Once the layers have been applied, the paper undergoes a dry state via the cooling zone. The paper is dry after approx. two minutes.After this, the coated paper is meticulously checked for, among other things:
- Paper sensitivity
- Coating deficiencies
- Quality
So to summarise: a laminated roll comes in, and is applied with 7 coated layers via the ‘Giesser’. It then goes to the cooling zone for the coated layers to coagulate, the paper then undergoes the drying process, is checked and then placed on a roll to be transported to the depot.
These mega rolls of photo paper are then cut to size into “baby rolls” of several sizes, to fit a range of machines and paper formats.
In a nutshell,
it’s a staggering process. But, put simply, it’s about paper comprising 7 layers all with their own properties and functions to yield as stunning a photo on the paper as possible; one that can be enjoyed for as long possible.
Fujifilm Original photo paper is regarded as the benchmark for photographic print quality. Fujifilm photo paper boasts the following properties, to name but a few:
- The most realistic air and water colour rendering
- Long-lasting colour retention
- Outstanding colour balance with very lifelike colour rendering
- Brilliant white
- The highest contrasts and optimal saturation
- Consistent quality throughout the process
What’s the difference between photochemical paper and inkjet?
Every original Fujifilm photo paper type is based on the traditional, silver halide, emulsion technique. The emulsion is embedded in gelatine which helps retain the durability of the image layers and protects them from chemical erosion from atmospheric pollution and physical wear & tear.
- Silver chloride crystals are light sensitive (depending on their size).
- Chemical sensibility renders them much more sensitive to blue, green or red light.
- The sensitising agent is absorbed by the AgX crystal.
- Sulphur and gold render the AgX more sensitive.
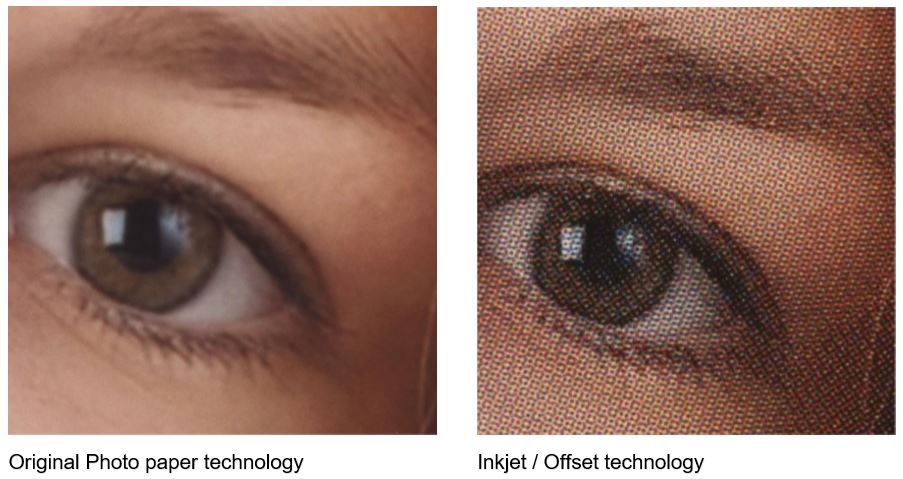
The process
When the silver halide crystals are exposed in the photo paper, a latent image is created via an RGB exposure system. Via a chemical process the photo paper is then applied by a developer, and then fixed, to make the image on the paper.
Silver halide image:
With silver halide paper (photo paper) the cyan, magenta and yellow colour layers lie on top of each other, to visually form one colour.
Digital press image / Inkjet:
With Inkjet the exact droplet position is never such that the cyan, magenta and yellow droplets land on top of each other. So, there’s never a question of additive colour.
Your photos deserve the best, wouldn’t you say? Fujifilm is a photographic film manufacturer that has continuously strived towards innovative solutions, unrivalled technologies and high customer satisfaction. From the very outset, quality has been paramount to Fujifilm, and to us. Fuji photo paper boasts extremely high resolution of a continuous tonal print system, which results in outstanding image sharpness. Quality is all important. Which means we constantly strive for the very best. We found this right from the outset of our partnership with Fujifilm. Fuji’s original photo paper delivers outstanding print quality and images that will retain their merit for years to come, providing optimal enjoyment.
Photos that outstrip reality
Of course, other (consumer) photo labs work with Fuji photo paper too, however they use the standard Crystal Archive paper which is high quality and yields beautiful sharpness and depth of colour. But, we use the Fujicolor Crystal Archive Digital Paper Type DPII, which is made exclusively for professional use. This yields the widest colour gamut, maximum density for deep black and outstanding colour saturation. It’s a head above the rest, giving us (and you) prints that surpass those offered by Hema, Albelli and Kruidvat, and all the others.
What you’ll love about it
As a professional photographer you want professional results. Fujicolor Crystal Archive Digital Paper Type DPII meets all the criteria: photos are brought to life with deep colours and expressive vibrancy. Reality fades as your photos outstrip it.
- Ideal for display purposes as it offers long-lasting, superior quality.
- Wedding memories are cherished forever.
- Yields superior quality digital prints: portraits and commercial photos are guaranteed to capture people’s attention.


